Replacement cost for a standard tank water heater can range from $800-$2800 depending on size, location, etc.
Replacement cost for a standard tankless water heater can range from $1200-$4800 depending on size, location, etc.

ABP | BLOG
Replacement cost for a standard tank water heater can range from $800-$2800 depending on size, location, etc.
Replacement cost for a standard tankless water heater can range from $1200-$4800 depending on size, location, etc.
Although sump pumps and sewage ejection systems, commonly referred to as “lift stations”, look similar at a glance, it’s important to know the difference between the two. Simply put, sump pumps handle and remove ground water, whereas sewage ejector pumps handle and pump domestic sewage produced by the use of plumbing fixtures in a home.
Sewage ejector pumps are necessary when the level of the sewer line is above the lowest plumbing fixture or drain line within a home. This is standard and necessary where a plumbing fixture has been installed in a basement with no previous plumbing, or commonly in new construction where an old home was demolished and replaced with a new home containing a basement. The level of the municipal sewer line cannot be lowered, so the home has to rely on a pump to “lift” the sewage to a point where it can naturally drain to the sewage by force of gravity. Sewage ejector pumps are typically identified by having a sealed lid with 2 pipes, whereas sump pumps often have only 1 pipe and may or may not have a sealed lid.
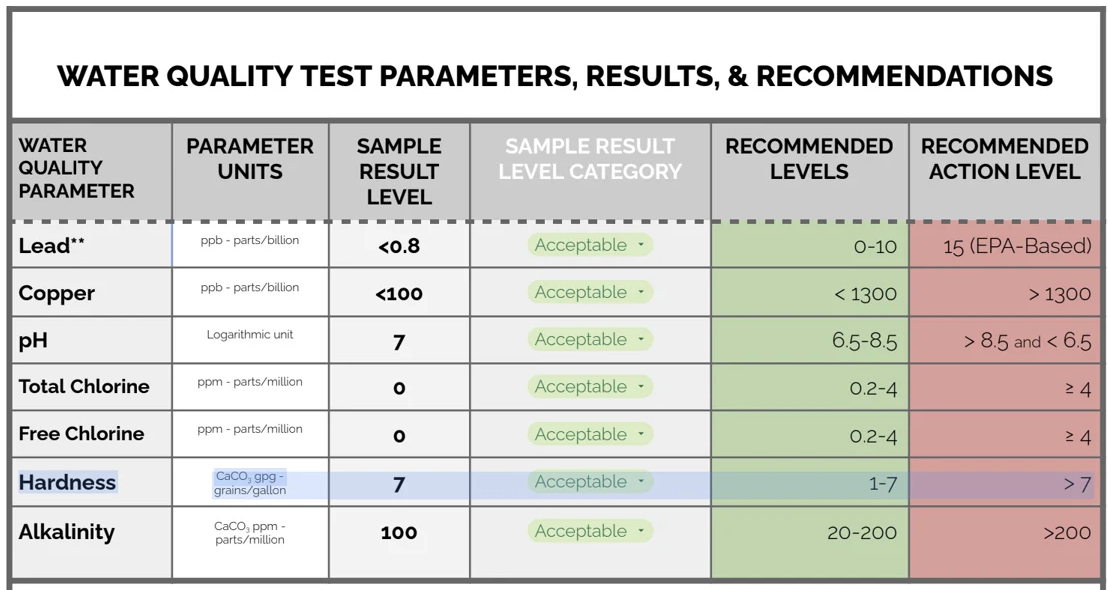
“Hard water” is water that naturally has high mineral content due to the soil that it once percolated through. Municipal water can be hard in addition to private drinking wells due to the fact that municipal water treatment disinfects, but does not treat water mineral content. Hard water does not pose a health hazard, and can even offer some mild health benefits, but it can lead to dry skin, limescale and soap scum buildup. Hard water can also lead to premature failure of water using appliances as the scale buildup can reduce water flow. A water softening system can be installed to neutralize hard water if desired.
How to determine if you have hard water?
Water hardness is a measure of the concentration of minerals in the water, mainly magnesium and calcium. This can be measured and is one of the test parameters that is included in the ABP Water Quality Test. See the image below for sample results included in the ABP water quality test.
Galvanized steel water supply piping was a commonly used plumbing material from the 1880’s-1960’s. Initially used as an alternative to lead pipes, it was later learned that galvanized pipes heavily rust and corrode from the inside outward as the zinc coating wears off. In addition to failing and leakage, lead can also be introduced into the water supply from the galvanizing process. The expected service life of galvanized steel plumbing is around 60 years, so all galvanized steel plumbing is theoretically due for replacement by now.
Polybutylene plumbing is a type of plastic resin water pipe that was a cheap and easy alternative to copper and was manufactured from 1975 to 1995. Polybutylene was banned in 1995 due to failure of pipes in the form of leaking and rupturing. Polybutylene is generally identified by its gray color with blue lettering usually stamped with “PB2110” and should be evaluated for replacement by a qualified plumbing contractor.
Kitec plumbing is a type of PEX water pipe that was manufactured from 1995 to 2007. Kitec was recalled in 2005 due to failure of pipes and fittings resulting in plumbing leaks. Kitec is generally identified by its bright orange or bright blue color and should be evaluated for replacement by a qualified plumbing contractor.
This is false. If the levels of radon in the soil are high enough, any home can have high radon levels whether or not the home is on a basement, crawlspace or slab foundation.
This is also false. It’s true that a home with an active and properly functioning mitigation system is less likely to have high radon levels, but it’s important to confirm that the system is working properly. We perform many radon tests on homes with systems that come back with levels over 4pCi/L.
Radon is a colorless, odorless gas that can seep into buildings and pose a health risk to occupants. Radon mitigation systems are designed to reduce radon levels in buildings to safe levels. Here are some of the most common types of radon mitigation systems:
Active soil depressurization (ASD): This is the most common and effective type of radon mitigation system. It involves installing a vent pipe in the basement or crawl space of the building and connecting it to a fan that draws radon from the soil and exhausts it outside.
Passive soil depressurization: This type of system is similar to ASD, but it does not use a fan. Instead, it relies on natural air currents to draw radon from the soil and exhaust it outside.
Sub-slab depressurization: This system is used when the building has a concrete floor. It involves drilling a hole in the floor and inserting a pipe that is connected to a fan, which draws radon from the soil beneath the slab and exhausts it outside.
Sump pump suction: This system is used when the building has a sump pump. It involves installing a vent pipe in the sump pit and connecting it to a fan, which draws radon from the soil and exhausts it outside.
Block wall suction: This system is used when the building has a hollow block foundation. It involves drilling holes in the block and inserting pipes that are connected to a fan, which draws radon from the soil and exhausts it outside.
Crawlspace ventilation: This system is used in buildings with a crawlspace. It involves installing vents in the crawlspace walls and using a fan to draw in outside air, which dilutes the radon and exhausts it outside.
The type of radon mitigation system used depends on the specific conditions of the building and the level of radon present. It's important to work with a qualified and experienced professional to design and install a radon mitigation system that is appropriate for your building and effective in reducing radon levels to safe levels.
The lifespan of a wood deck depends on several factors, including the type of wood used, the quality of the construction, the climate and weather conditions, and how well it is maintained. With proper care and maintenance, a wood deck can last anywhere from 10 to 50 years.
To ensure the longevity of your wood deck, it's important to keep it clean and well-maintained. Regular cleaning, staining, and sealing can help protect the wood from moisture, UV damage, and other types of wear and tear.
In general, a wood deck should be sealed or stained every one to three years, depending on the type of wood, the climate, and the level of use. A good rule of thumb is to perform a water test on your deck every year to determine whether it needs to be sealed. If water droplets bead up on the surface, the deck is still adequately sealed. If the water is absorbed into the wood, it's time to reseal.
Keep in mind that there are different types of sealers available, such as clear sealers, semi-transparent stains, and solid stains, each with different levels of protection and durability. It's important to choose a sealer that is appropriate for your climate and the level of use your deck receives. Additionally, regular maintenance such as cleaning and repairs can also help extend the lifespan of your deck.
We spoke with Kyler Williams, Owner of Dream Painting, to determine how often a home with wood siding should be re-stained or re-sealed. Please note that this email refers to staining/sealing of wood siding which is different than paint. Here is what Kyler had to say:
There are 4 types of wood siding stains and each type has a different service life. The general service life of each stain type is listed below and is based on when the stain begins to lose its original appearance.
Transparent/clear stain (2-3 years)
Semi Transparent stain (3-5 years)
Semi-solid stain (4-6 years)
Solid stain (5-7 years)
As you can see, the more solid the stain, the longer lasting it is.
Source - Kyler Williams, Owner of Dream Painting
We spoke with Louis Wilson of Ascent Garage Doors to get some answers about garage door and motor pricing. Here is what he had to say.
A garage door opener typically costs around $500 for a basic motor and $900 for a premium model.
The cost to replace a garage door depends on the door;
Hollow or vinyl backed single doors start at $1,000 and double doors at $1,700, but we do not recommend these types of doors, as they’re cheap and unreliable and will likely cost you more in the long run.
We recommend steel sandwich doors. They are much more durable and long lasting. Single doors start at $1,400 and doubles start at $2,300. Adding windows or wood grain colors or specialty insulation will increase the price about 30-50%.
More unique, boutique type doors can start at $3,000 single/$5,000 double and go up to $15,000 - $20,000 for double doors.
As you can tell, there are many options when replacing a garage door and garage door opener, so prices vary significantly.
Source - Louis Wilson of Ascent Garage Doors
A typical garage door opener should last 15 years. It’s not uncommon for them to last longer, especially if properly maintained, but 15 years is a good guideline.
A garage door and opener servicing generally costs between $120-$150, but many companies will run door service specials periodically for less than $100.
Routine garage door and opener service typically includes a comprehensive inspection of panels, hinges, bearing, cables, drums, track and opener for any irregularities. This also typically includes re-tensioning the springs for proper balance as well as making any adjustments to the door to make things run as smoothly as possible. A garage door technician should also check the opener limits and sensitivity to ensure safe operation.
Garage door professional, Louis Wilson, of Ascent Garage Doors recommends that garage doors should be serviced annually or at least every other year in order to maintain proper spring balance and make sure there isn’t any progressive failure of components that could cause larger problems.
Many people don’t realize it, but a garage door is the largest moving part of a home and can present safety issues if not properly serviced. Regular service greatly reduces the risk of large problems with your door coming off track, getting stuck, or even panels falling, which is a huge safety hazard.
Determining the age of HVAC systems and water heaters is generally a bit more complicated than simply looking at the equipment data plate and finding a manufacturing date. Most manufacturers use a date code that is represented in the serial number. Because each manufacturer has a different date code system, you will need to reference the Building Intelligence Center HVAC and Water Heater Index. This is a great tool and resource to have bookmarked for quick reference as needed. We have provided a link below for your reference.
https://www.building-center.org/
AS A REMINDER, THE EXPECTED SERVICE LIFE FOR THE MOST COMMON HOME SYSTEMS ARE LISTED BELOW:
FURNACE - 25 years
A/C - 15 years
BOILER - 30 years
WATER HEATER - 12 years
These estimated service lives are per industry standards. Actual equipment service life may vary
Why Does My New Oven Smell Like Burning Plastic?
You may be wondering why your new oven is smoking and giving off a strong burnt plastic or chemical smell upon initial operation. If so, you are not alone. The good news is that this burning smell and smoking process is completely normal for new ovens. In fact, if you read your appliance manual, you will see that this is addressed in the manual and is commonly referred to as the “burn in” period.

Smoke coming from a new oven upon initial operation
What is “burn in”?
Your new oven is being exposed to high temperatures for the very first time. During this initial exposure to heat, oils used in the manufacturing process are being burnt off and the insulation enclosure is emitting an odor as it heats up. Typically this burn in process takes around an hour, but can take more or less time depending on the specific appliance.
Please note that all appliances should be free of any packaging before they are used for the first time. If packaging materials are not removed, you may actually be smelling burning plastic which you do not want so be sure to clean the oven out before initial use. Also, it’s important to note that you should cycle your oven through the burn in phase before you use it for cooking. During the burn in phase, make sure that your kitchen is properly ventilated so that chemicals and odors are exhausted to the exterior. If burning smells persist after the burn in period, please stop use of the appliance and contact the manufacturer for further troubleshooting.
A typical home inspection often takes around 3 hours and presents a great opportunity for homebuyers to learn and discover a lot about their prospective home beyond the insights of the home inspection itself. Oftentimes we are asked by our clients what they should do during the inspection. Here are some suggestions: